1. Basic concepts of a Call Center
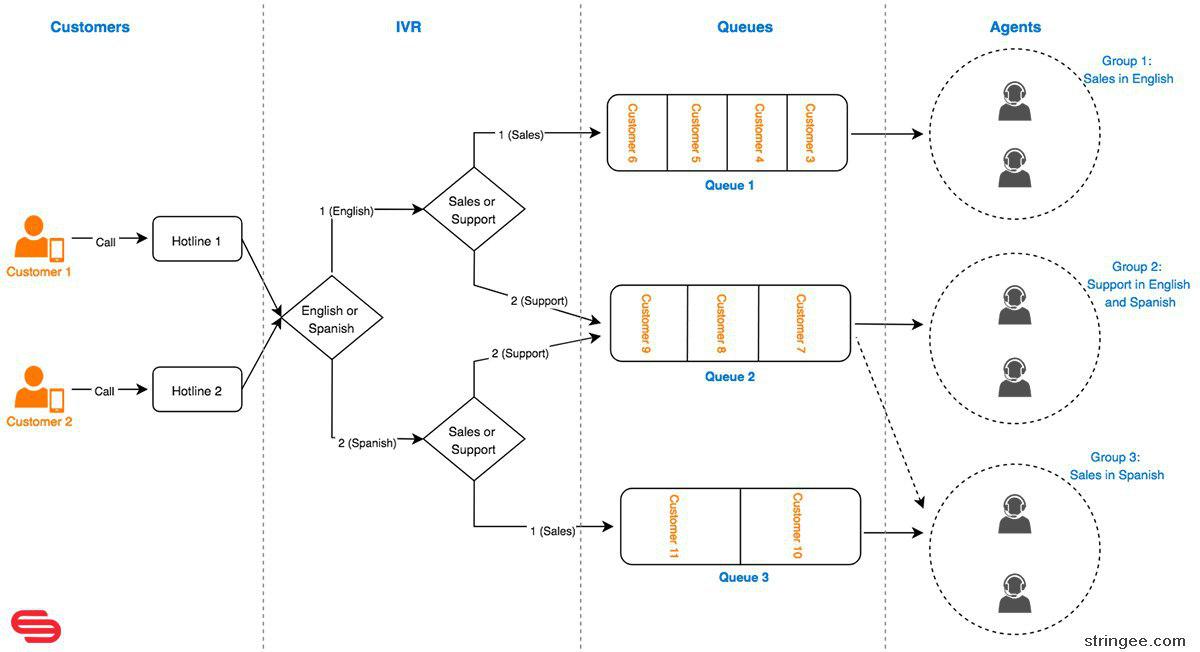
Below is an example flow of calls from customers to the company's Hotlines:

e.g. You can make a call to Stringee's Hotline at 84-2473-0000-97 to try
a. IVR (Interactive voice response)
In the figure above, Customer will listen to a Greeting message like: "Press 1 to listen to instructions in English, press 2 to listen to instructions in Spanish". When button 1 is pressed, Customer will hear a message in English: "To meet a Salesman, press 1. To see Technical Support, press 2.",...
At this time, the customer is in an IVR tree. A message is called an IVR node. At a node, the customer can press a key to go to another node, or to see an agent. A key press can be understood as a branch.
b. Queue
When the customer presses 2 after listening to the message of the first node, the customer will be transferred to Queue 2, to wait for an Agent.
The queue is made to ensure that when the number of Agents is smaller than the number of waiting customers, the customers will be served in proper order: First come first served.
c. Agent & Group
There are 3 groups in the sample flow:
- Group 1: Agents who can speak English, with Sales skills
- Group 2: Agents who can speak both English and Spanish, with Technical Support skills
- Group 3: Agents who can speak Spanish, with Sales skills.
d. Route the calls to Groups (Group routing)
Queue 1: Group 1 is assigned to Queue 1, to serve Customers who want to talk to English-speaking Salespeople.
Queue 2: Group 2 is assigned to Queue 2, to serve Customers who need Technical Support. Besides, when all agents in Group 2 are busy, the customer who waiting in Queue 2 can be served by agents in Group 3.
Queue3: Group 3 is assigned to Queue 3, to serve Customers who want to talk to Spanish-speaking Salespeople.
Groups can be assigned to a Queue with Priority flag. It's called Group Routing.
e. IVR is optional
IVR can be ignored, customers will be routed to Queues directly by setting enable_ivr = false in Number's settings https://developer.stringee.com/docs/pcc-rest-api/integrable-contact-center-number-management
2. Steps to build a Call Center with Stringee PCC API
Watch a tutorial video here:
Step 1: Create a Project and buy Hotline Number
- Create a new Project here
Enable the option "Enable Programmable Contact Center API for this Project?" or configure URLs for the Project like below:

Answer URL: http://v2.stringee.com:8282/project_answer_url
Event URL: http://v2.stringee.com:8282/project_event_url
Caution: In order to use PCC API, URLs must be configured exactly like above.
- Buy a Hotline Number here (or you can use your own number, contact us for more details). Assign the number to Project created in Step 1.
Enable the option "Enable Programmable Contact Center API for this Number?" or configure URLs for the Project like below:

Answer URL: http://v2.stringee.com:8282/answer_url)
Event URL: http://v2.stringee.com:8282/event_url
Caution: In order to use PCC API, URLs must be configured exactly like above.
Step 2: Configure the Number, IVR, Queue, Agent, Group, Group routing
To be able to configure those components, you can use REST APIs described here. However, you can start quickly by using the tools we already built here: https://pcc.stringee.com/
Login to https://pcc.stringee.com/ and choose the Project created in Step 1.
a. Configure Hotline Number
Add the Hotline bought in Step 1 here: https://pcc.stringee.com/setting/number
b. Configure IVR
Create a new IVR tree: https://pcc.stringee.com/setting/ivrtree
Create the first IVR Node for the IVR tree
c. Add Agents
Add agents here: https://pcc.stringee.com/setting/agent
d. Create Groups
Create groups here: https://pcc.stringee.com/setting/group
Add agents to groups.
e. Create Queue
Create Queues here: https://pcc.stringee.com/setting/queue
f. Set Group Routing
Choose a Queue and click on it to assign Groups for the queue.
g. Route to Queue when a key is pressed in IVR
Choose an IVR tree, pick a node and add a keypress for that node.
Choose the action "Route to queue" for the keypress
h. Greeting messages & Waiting songs for Queues
Upload and manage greeting messages and waiting music here: https://pcc.stringee.com/setting/greeting
i. Enable IVR for the inbound calls
Go to the link https://pcc.stringee.com/setting/number, click "Edit" for the number you want to configure, enable "Enable IVR" and choose the IVR tree you created before.
After finishing the above steps, you can try calling to your Hotline number, listen to the IVR and press a key to be transferred to a Queue.
Step 3: Build a client to receive calls
a. Agent and Statuses
Each agent has main attributes:
{
    "stringee_user_id": "agent_1",
    "phone_number": "84909982888",
    "routing_type": 1,
    "manual_status": "AVAILABLE",
    "system_status": 0
}
More details at here.
Which:
- stringee_user_id: is the userId which Agent uses to authenticate with Stringee. More details on authentication here. Caution: icc_api=true must be presented in the Payload (only PCC API requires this paremeter):
{
    "jti": "SK...-...",//JWT ID
    "iss": "SK...",//API key sid
    "exp": ...,//expiration time
    "userId": "...",
    "icc_api": true
}
phone_number: Agent's phone number (must include country code)
routing_type: 1: Route the call the App/SIP Phone; 2: Route the call to Agent's phone number
manual_status: Agent's status, can be changed by agent him/her self. To be able to receive the calls, this status must be AVAILABLE.
system_status: Agent's status, is managed by Stringee's system. When an agent is on call, his/her system_status will be "0"; system_status will be "1" if the agent is not on call.
Online/offline status: An agent is considered Online when he/she satisfies one of below criteria:
(or) Logging into Stringee via App/Web
(or) Already logged in to the App; PUSH NOTIFICATION device token (iOS/Android) is available, it guarantees the agent can receive calls via push notification.
(or) Being online on a SIP Phone
b. Required conditions for an agent to be able to receive calls
Stringee PCC will route calls to an agent if he/she satisfies one of below criteria:
- system_status=1
- manual_status=AVAILABLE
- routing_type=1 and Agent is Online; or routing_type=2 and Agent has his/her phone number configured.
c. Use App/Web for Agents to receive calls
For an agent to log in to Stringee system, to be able to receive calls, you need an access_token - described here.
To generate access_token quickly, you can use a tool provided by us at here, choose the Project you created in Step 1 & 2, enter the "User ID" (which is Agent's stringee_user_id).
Caution: You need to check the box "For PCC API" (icc_api=true will be added to the payload):

We have sample apps which you can use with your own access_token:
Web
iOS
Android
React Native
Besides that, we also provide Stringee Web Phone (100% built on Stringee JavaScript SDK) with completed UI, for you to integrate quickly into your Web:

Integrate the JavaScript code below into your Web:
<script src="https://static.stringee.com/stringeex/web_phone/latest/js/StringeeSoftPhone-lastest.js"></script>
<script>
    var config = {
        showMode: 'full',//full | min | none
        top: 45,
        left: 50,
        //right: 810,

        arrowLeft: 155,
        arrowDisplay: 'top',//top | bottom | none

        //list your Stringee Number
        fromNumbers: [{alias: 'Number-1', number: '+84899199586'}, {alias: 'Number-2', number: '+2222'}]
    };
    StringeeSoftPhone.init(config);

    var access_token2 = 'YOUR_ACCESS_TOKEN';

    StringeeSoftPhone.on('displayModeChange', function (event) {
        console.log('displayModeChange', event);
        if (event === 'min') {
            StringeeSoftPhone.config({arrowLeft: 75});
        } else if (event === 'full') {
            StringeeSoftPhone.config({arrowLeft: 155});
        }
    });

    StringeeSoftPhone.on('requestNewToken', function () {
        console.log('requestNewToken+++++++');
        StringeeSoftPhone.connect(access_token2);
    });

    StringeeSoftPhone.connect(access_token2);
</script>
Demo: https://v1.stringee.com/demo/web_phone.html
Detail instruction here
We provide source code at here.
d. Use SIP Phone for Agents to receive calls (Optional)
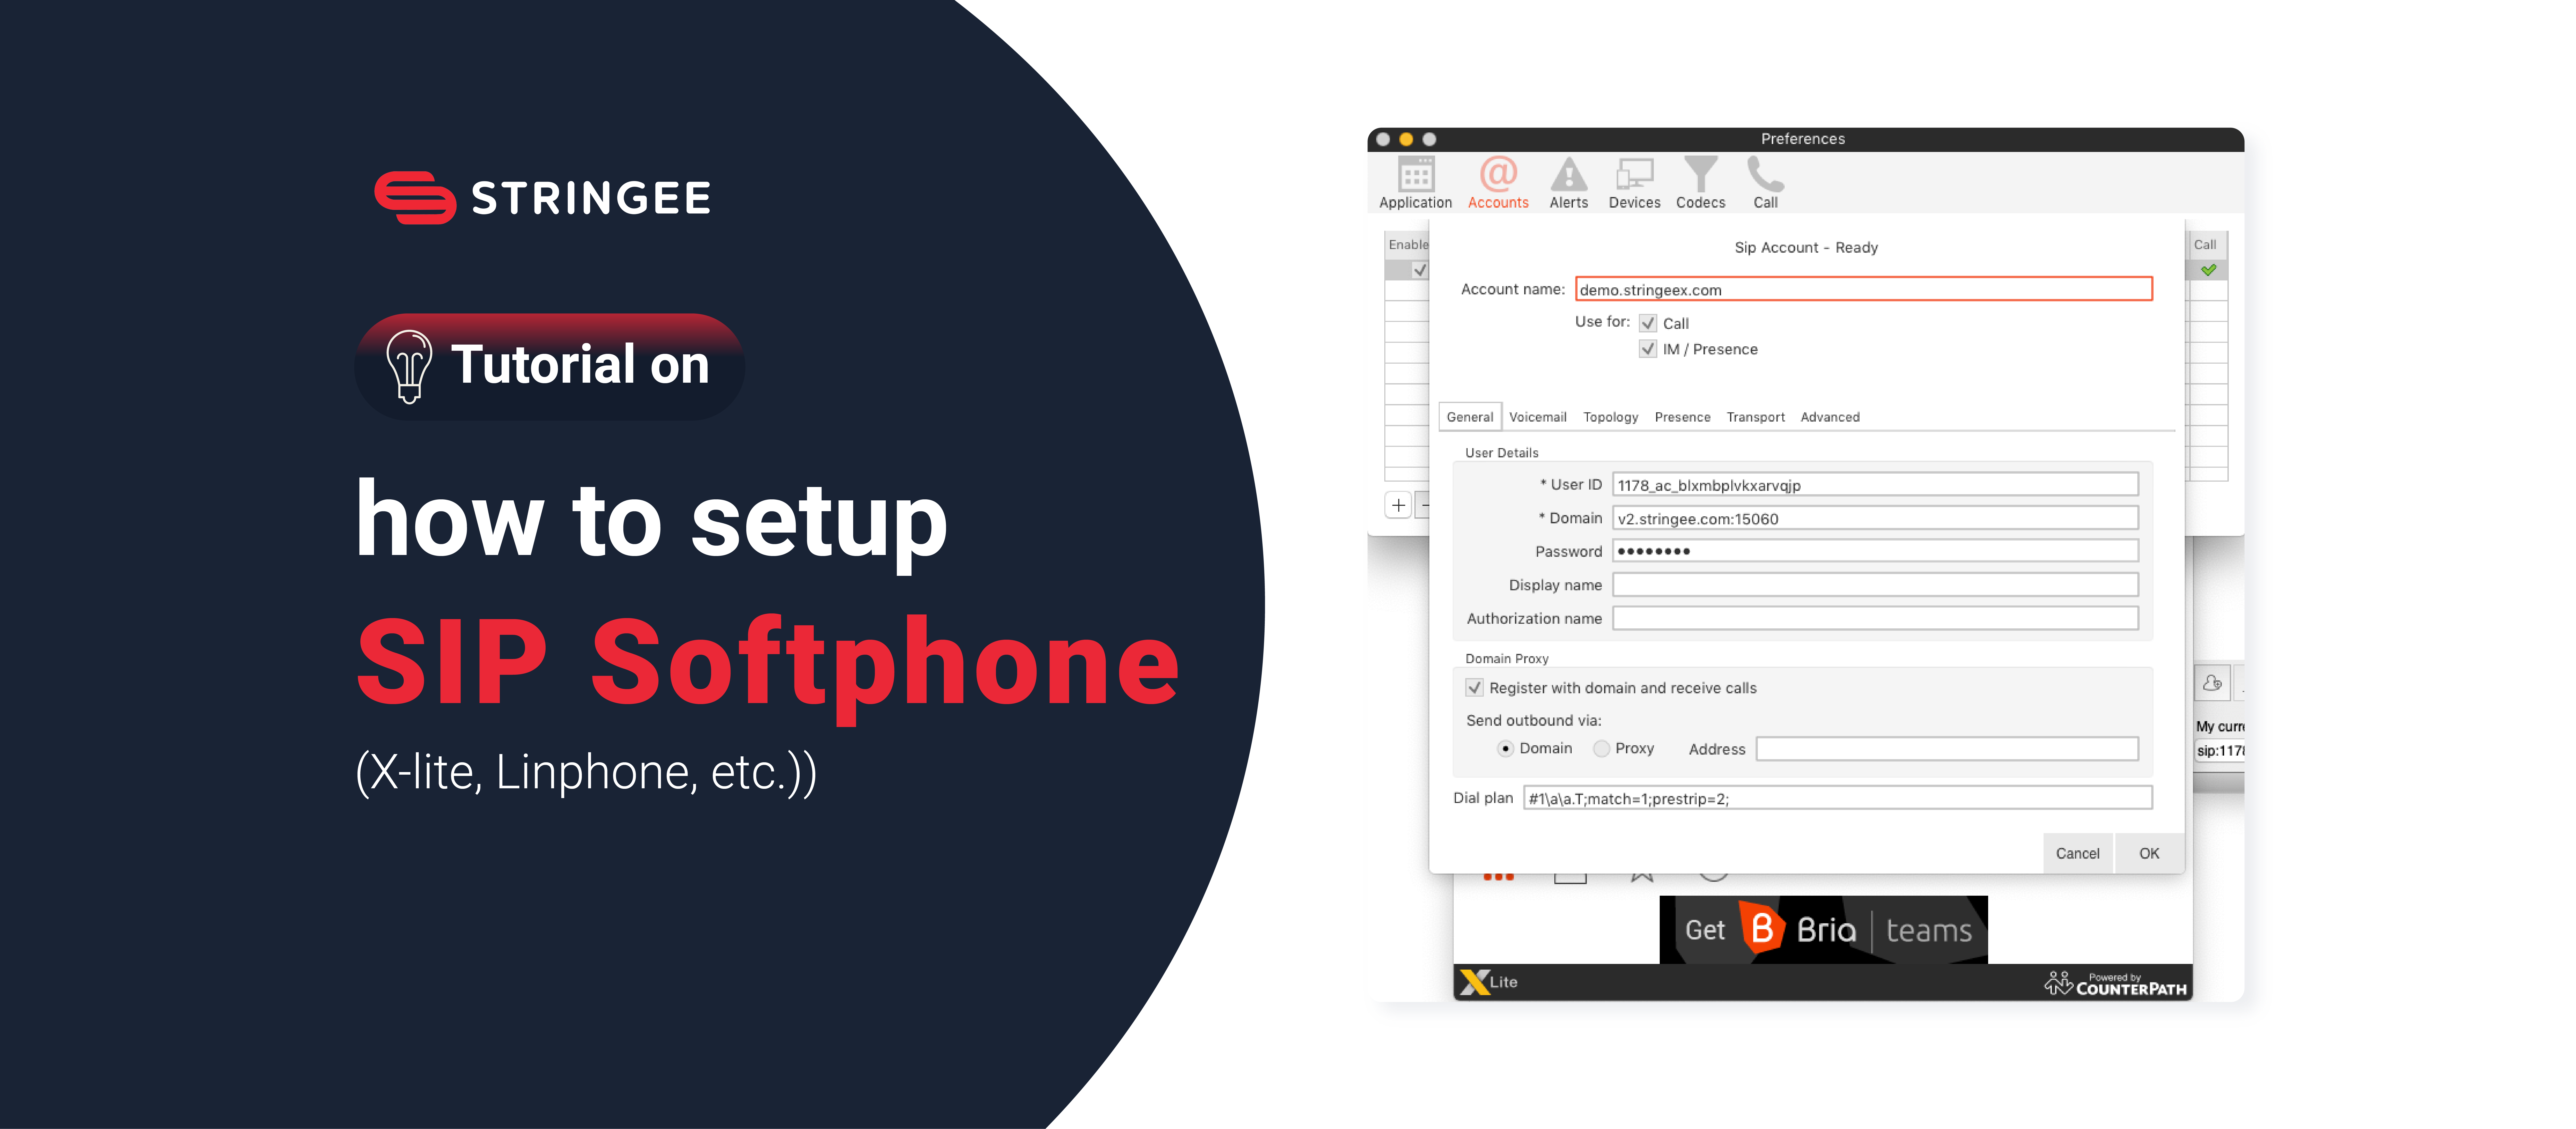
If you want an Agent to be able to receive calls on SIP Phone (IP Phone or SIP Softphone), during creating the Agent, you need to tick "Create SIP Phone account" and enter "SIP Phone password":

You can use API to manage SIP Phones: https://developer.stringee.com/docs/call-rest-api/sip-phone-management
Stringee credential for SIP Phone registration:
Domain: v2.stringee.com:15060
Username: projectId_userId
Password: the password you entered before

Step 4: Make outbound calls
a. Method 1:
Use Mobile SDK or Web SDK, call the function makeCall(), e.g. with Web SDK:
call = new StringeeCall(stringeeClient, fromNumber, toNumber);
settingCallEvents(call);
call.makeCall(function (res) {
    console.log('make call callback: ' + JSON.stringify(res));
});
which:
- fromNumber: is Hotline number, bought in Step 1 & 2
- toNumber: is customer's phone number
b. Method 2:
Use REST API described below to make a call to Agent's App/SIP Phone first; when Agen picks up, make another call to the customer and connect 2 ends:
POST https://icc-api.stringee.com/v1/call/callout
{
    "agentUserId": "huy",
    "toAgentFromNumberDisplay": "Call-out-from-842473082686",
    "toAgentFromNumberDisplayAlias": "Call-out-from-842473082686-Alias",
    "toCustomerFromNumber": "84899199586",
    "customerNumber": "84909982888"
}
which:
- agentUserId: Agent's stringee_user_id
- toAgentFromNumberDisplay: the number will be shown to the agent
- toAgentFromNumberDisplayAlias: alias of the number will be shown to the agent
- customerNumber: Customer's phone number
- toCustomerFromNumber: the number will be shown to the customer
c. Method 3:
Call directly from SIP Phone
Step 5: Customize Agents who will receive calls (optional)
By default, (inbound) call in Queue will be routed to Agents in Groups (assigned to Queue)
However, you can also customize the Agent group to receive calls for each different call (each customer).
e.g. Customer A left his phone number on your website, and your CRM assigned the customer to Agent "Sales 1". When customer A calls in, the agent "Sales 1" will be prioritized; if the agent "Sales 1" does not pick up the call or is busy, the call will be routed to "Sales 2" or "Sales 3"...
To be able to customize call routes like above, you have to configure the param "get_list_agents_url" of the Queue
a. When there is a call routed to Queue, Stringee sends HTTP POST to "get_list_agents_url" to get a list of agents who will receive the call.
Method: POST
Body:
{
    "queueId": "queue_1",
    "calls": [{
        "callId": "call-vn-1-EHHC6JW1LT-1534145391502",
        "from": "84986776777",
        "to": "842473082666"
    }, {
        "callId": "call-vn-1-EHHC6JW1LT-1534145391504",
        "from": "84919982888",
        "to": "842473082888"
    }],
    "projectId": 25
}
which
| Field | Type | Require | Description |
|---|---|---|---|
| queueId | String | Yes | Queue ID |
| projectId | Int | Yes | Your project ID |
| calls | Array | Yes | List of calls present in Queue at the moment |
b. The data you have to return:
{
    "version": 2,
    "calls": [{
            "callId": "call-vn-1-EHHC6JW1LT-1534145391502",
            "agents": [{
                    "stringee_user_id": "agent_1",
                    "phone_number": "84909992666",
                    "routing_type": 2,
                    "answer_timeout": 15
                },
                {
                    "stringee_user_id": "agent_2",
                    "phone_number": "84909992666",
                    "routing_type": 1,
                    "answer_timeout": 10
                }
            ]
        },

        {
            "callId": "call-vn-1-EHHC6JW1LT-1534145391504",
            "agents": [{
                    "stringee_user_id": "agent_1",
                    "phone_number": "84909992666",
                    "routing_type": 2,
                    "answer_timeout": 15
                }
            ]
        }
    ]
}
which
| Field | Type | Require | Description |
|---|---|---|---|
| version | Int | Yes | Must be 2 |
| calls | Array | Yes | List of calls present in Queue, accordingly match with the list Stringee sent before |
Parameters of each "call":
| Field | Type | Require | Description |
|---|---|---|---|
| callId | String | Yes | Call ID |
| agents | Array | Yes | List of agents who can receive calls, sort in priority order: Agents who stand in front (listed first) will have higher priority. If an agent in front is free, he/she will pick the call. If that agent is busy, Stringee will check the status of agents behind, one by one |
Parameters of each "agent":
| Field | Type | Require | Description |
|---|---|---|---|
| stringee_user_id | String | Yes | Agent's User ID |
| phone_number | String | No | Agent's phone number, starts with country code |
| routing_type | Int | Yes | 1: Route the call to App/SIP Phone, 2: Route the call to Agent's Phone Number |
| answer_timeout | Int | Yes | If the agent is free, the call will be routed to the agent and maximum time for the agent to pick up the phone is a parameter in seconds. After an amount of time, if the agent does not pick up the call, the call will be routed to another agent in the list your server returned |
Step 6: Some important notes
If you don't use IVR, customer calls will be routed directly to a Queue:
- Set the parameter "enable_ivr=false" for the Hotline (API)
Configure important parameters (API):
- wait_agent_answer_timeout: If the agent is free, the call will be routed to the agent and maximum time for the agent to pick up the phone is a parameter in seconds. After an amount of time, if the agent does not pick up the call, the call will be routed to another agent. If there is only one agent in the group, the call will be routed to that agent again.
- wrap_up_time_limit: If the parameter agent_wrap_up_after_calls=true, after hanging the phone , Agent will have wrap_up_time_limit (in seconds) to do data input tasks, calls cannot be routed to the agent even when the agent is free.
- get_list_agents_url: If this parameter is set, Stringee PCC will not take agents list from Groups but take agents list from returned data from get_list_agents_url
- Control the outbound calls & Set permissions for agents: Configure the parameter callout_answer_url. When agents make outbound calls, Stringee PCC will send a request to Answer URL, that URL has to return SCCO to decide if the calls are allowed or not.
Reference: https://developer.stringee.com/docs/server/event-url-and-answer-url


